เข้าใจ OpenID Connect Discovery Endpoint และการแก้ปัญหาเมื่อเชื่อมต่อกับ Auth0
ช่วงนี้กำลังทำ infrastructure platform สำหรับ operate API server ที่เชื่อมต่อกับ Auth0 แล้วมีงานที่ต้องขึ้น environment ใหม่ คราวนี้เจอปัญหาเมื่อ API server รับ JWT (JSON Web Token) จาก request จากฝั่ง client โดยขึ้นข้อความแสดง error ดังนี้
System.InvalidOperationException: IDX20803: Unable to obtain configuration from: '[PII is hidden. For more details, see https://aka.ms/IdentityModel/PII.]'.
 ---> System.IO.IOException: IDX20807: Unable to retrieve document from: '[PII is hidden. For more details, see https://aka.ms/IdentityModel/PII.]'.
เมื่อนำ error code ไปหาใน internet ก็พบว่าหลาย ๆ คนที่เจอปัญหานี้คือ application ไม่สามารถดึงข้อมูลการตั้งค่าจาก Auth0 server ได้ ซึ่งอาจเกิดขึ้นเพราะปัญหาการเชื่อมต่อ หรือการตั้งค่าไม่ถูกต้อง ซึ่งพอเข้าไปดูก็พบว่า IP address ของ NAT Gateway ใน environment ใหม่ยังไม่ได้ถูก whitelist ใน CDN ที่จะออกไปหา Auth0 server นั่นเอง
หลังจากแก้ไขปัญหา
วิธีการแก้ปัญหาก็คือ update whitelist ใน CDN ที่จะออกไปหา Auth0 server ด้วย IP address คำถามถัดมาคือ
แล้วเราจะมีวิธีทดสอบว่า application สามารถเชื่อมต่อกับ Auth0 ได้อย่างถูกต้องหรือไม่ได้อย่างไรโดยที่ยังไม่ต้องทดสอบแบบ end-to-end เพราะตอนนั้นอยากได้ feedback loop ที่เร็วก่อน
แล้วเราก็ไปเจอกับ Discovery Endpoint ซึ่งเป็น URL ที่ช่วยให้ application สามารถดึงข้อมูลการตั้งค่าของ Identity Provider (IdP) ได้อัตโนมัติ เช่น URL สำหรับการขอ authorization, token, หรือข้อมูลเกี่ยวกับ public keys ที่ใช้ยืนยัน JWT โดย Discovery URL มักจะอยู่ในรูปแบบ
https://<AUTH0_DOMAIN>/.well-known/openid-configuration
ตัวอย่างเช่น ถ้าใช้ Auth0 Discovery URL ก็จะเป็น
https://YOUR_AUTH0_DOMAIN/.well-known/openid-configuration
Discovery Endpoint จะให้ข้อมูลเกี่ยวกับ
- URL สำหรับการขอ Authorization (
authorization_endpoint) - URL สำหรับการขอ Token (
token_endpoint) - URL สำหรับการยืนยัน UserInfo (
userinfo_endpoint) - Key สำหรับการยืนยัน JWT (
jwks_uri)
{
  "issuer": "https://example.com/",
  "authorization_endpoint": "https://example.com/authorize",
  "token_endpoint": "https://example.com/token",
  "userinfo_endpoint": "https://example.com/userinfo",
  "jwks_uri": "https://example.com/.well-known/jwks.json",
  "scopes_supported": ["pets_read", "pets_write", "admin"],
  "response_types_supported": ["code", "id_token", "token id_token"],
  "token_endpoint_auth_methods_supported": ["client_secret_basic"],
  ...,
}
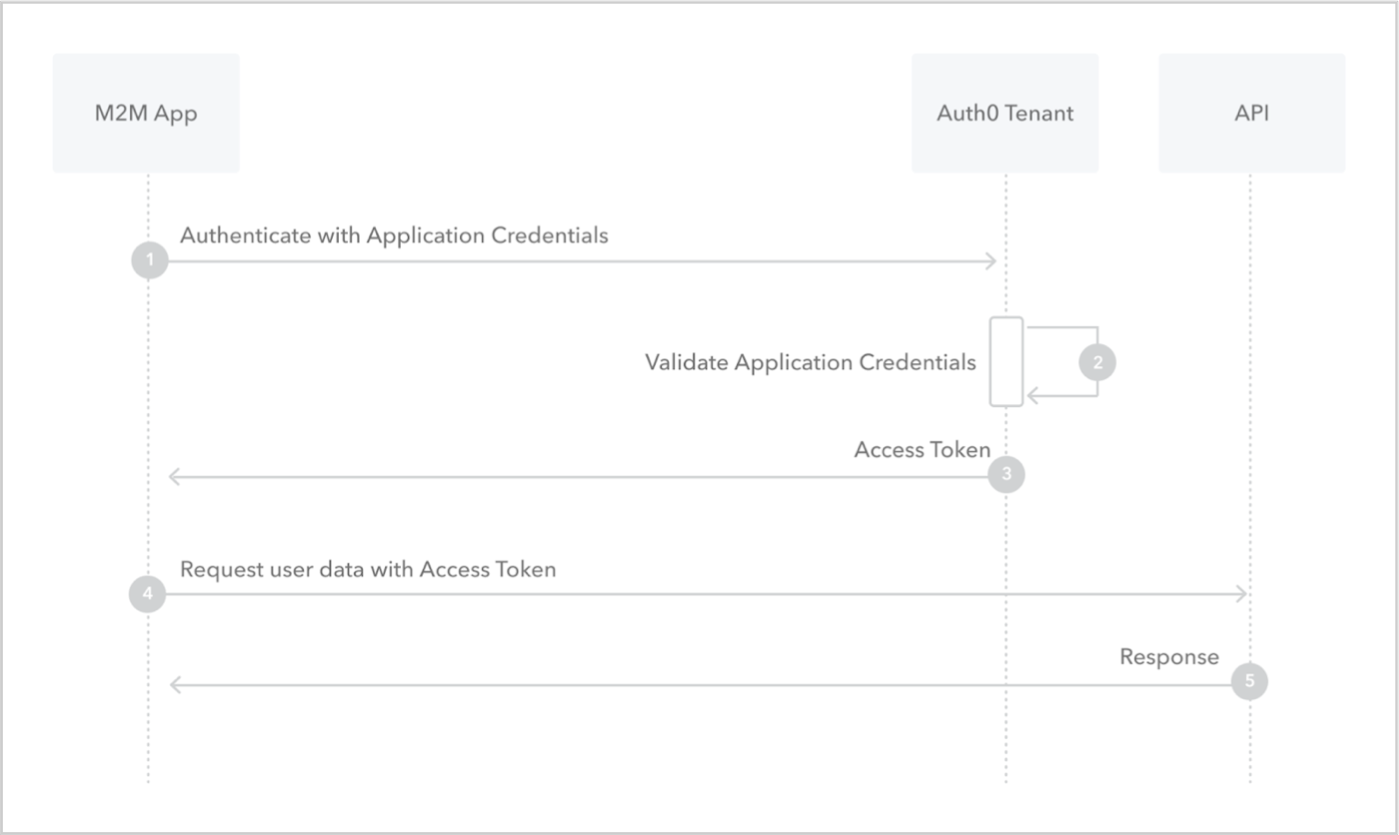
ตัวอย่างการทำงานของ OpenID Connect Discovery ระหว่าง Application (Client), Identity Provider (Auth0), และ Resource Server (API server) ใน Client Credentials Flow
 https://auth0.com/docs/get-started/authentication-and-authorization-flow/client-credentials-flow
- Application (Client) ต้องการเข้าถึง API server แต่ต้องขอสิทธิ์ก่อน จึงเริ่มกระบวนการขอ token
- Application ใช้ Discovery Endpoint ดึงข้อมูลการตั้งค่าจาก Auth0 ผ่าน Discovery URL เพื่อหาว่า URL ไหนใช้ขอ Token
- Application ขอ Access Token จาก Auth0 ใช้ข้อมูลที่ดึงจาก Discovery URL เพื่อขอ Access Token โดยส่ง client credentials (
client_id,client_secret) ไปที่ token_endpoint - Auth0 ส่ง Access Token กลับมา หลังจาก Auth0 ตรวจสอบ client credentials
- Application ใช้ Access Token เพื่อเข้าถึง Resource Server (API)
- API Server ตรวจสอบ Access Token โดยใช้ข้อมูลจาก Discovery Endpoint
- API Server ตอบกลับข้อมูลที่ต้องการ
สรุป
ปัญหาที่เกิดขึ้นจากการไม่สามารถเข้าถึง Discovery Endpoint ได้นั้น อาจเกิดจาก URL ที่ไม่ถูกต้องหรือปัญหาการเชื่อมต่อทั่วไป การตรวจสอบการตั้งค่า Discovery URL จะช่วยให้แก้ไขปัญหานี้ได้ง่ายขึ้น และเมื่อ application สามารถดึงข้อมูลจาก Discovery Endpoint ได้ ก็ช่วยให้มั่นใจได้ว่าการทำงานของการเชื่อมต่อระหว่าง Application, Identity Provider, และ Resource Server สำเร็จนั่นเอง