มาทำ API Security ใน Spring Boot ตาม OWASP API Security Project กัน (Part 1)
เนื่องจากมีโอกาสได้อ่าน OWASP API Security Project ดังนั้นจึงมาปรับปรุง Security ของตัวเองซะหน่อย โดยจะเริ่มจากระบบงานพัฒนาด้วย Spring ที่ไม่เคยทำอะไรเกี่ยวกับ Security เลย
ขอแบ่งเป็นตอนๆ ไปละกันเพราะตั้งใจว่าจะทำให้ครบ 10 ข้อเลย แต่น่าจะยาวเกินไปใน blog เดียว
เริ่มจาก API2:2019 Broken User Authentication
มักเกิดจากการทำ Authentication แบบผิดๆ ทำให้คนที่จะโจมตี API เราสามารถคาดเดาได้ง่าย เช่น
- Basic authentication (username / password) ที่ง่ายต่อการโดนเดา password ถูกแบบ brute force
- เอา Credentials ติดไปกับ URL
- ไม่มีการ validate token ที่เข้ามา ทั้ง signed algorithm และ expiring date
วิธีการป้องกัน
- ใช้ Standard end-user authentication เช่น OAuth หรือ Multi-factor
- ตั้ง expiry date ของ access token ให้สั้นๆ เช่น 30 นาที หรือ 1 ชั่วโมง
ตัวอย่างระบบจะทำ OAuth2 authentication บน API ที่พัฒนาด้วย Spring Boot กัน โดยมี feature คร่าวๆ ดังนี้
- User สามารถ create Order ได้ (Write access)
- User สามารถ find Order จาก id และ query parameters ได้ (Read access)
ก่อนจะเริ่มก็ทำความเข้าใจ token-based authentication ซะหน่อย
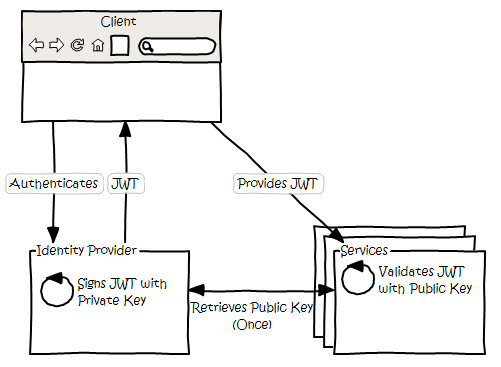
- JSON Web Token (JWT) หมายถึง ข้อมูลที่ระบุ identity ของ client ในรูปแบบของ JSON ซึ่งถูกเข้ารหัส (sign) เป็น token
- JSON Web Signature (JWS) หมายถึง signature ที่เกิดจากการ sign JWT ด้วย authorization server
- JSON Web Key (JWK) หมายถึง ข้อมูลที่ใช้ในการ validate JWS ในรูปแบบของ JSON ซึ่งมันคือ public key ที่ได้รับมาจาก authorization server
- JSON Web Key Set (JWKS) หมายถึง ชุดของ JWK ที่เก็บใน resource server
- Authorization Server (Identity Provider) หมายถึง server ที่ทำการ sign JWT จาก request ของ client
- Resource Server หมายถึง server ที่ทำการ validate JWT โดยใช้ JWK ซึ่งได้รับมาจาก authorization server
เราจะในคำเหล่านี้มาร้อยกันเป็น flow ของ token-based authentication ที่สามารถอธิบายได้ตามรูปนี้เลย
 https://redthunder.blog/2017/06/08/jwts-jwks-kids-x5ts-oh-my/
ใน flow นี้ยังไม่ได้ครอบคลุมตัวอย่างที่เรากำลังจะทำทั้งหมดนะครับ มันยังมีบางอย่างที่เป็น behind the scene เช่น
- JWK Token Store หมายถึง ที่จัดเก็บ JWT ตั้งอยู่ใน resource server ที่ได้รับมาจาก client ใช้สำหรับ decode JWT และ verify JWS ด้วย JWK
- Token Issuer หมายถึง web หรือบริษัทที่เป็นเจ้าของ JWT ซึ่งในตัวอย่างเราจะใช้ Microsoft Azure นั่นเอง
ตัวย่อแม่งจะเยอะไปไหน…
อธิบายลักษณะ Azure access token
Azure access token จะแบ่งเป็น 3 ส่วน แต่ละส่วนจะมี JSON key เพื่อบ่งบอกข้อมูล (เราจะเรียกมันว่า claims) ดังนี้ ส่วนที่ 1 คือ token type และ algorithm ที่ใช้ sign
ส่วนที่ 2 คือ data เน้นในส่วนของ roles claims นะครับ เพราะเราต้องใช้ในการ identify role ด้วย
ส่วนที่ 3 คือ การ verify signature ซึ่งขึ้นอยู่กับ secret ที่นำมาเข้ารหัส
รายละเอียดเต็มๆ อ่านได้ที่นี่เลยครับ Microsoft identity platform access tokens
ติดตั้ง Dependencies สำหรับการทำ OAuth2 authentication
- spring-security-oauth2-autoconfigure สำหรับการทำ token store
- java-jwt สำหรับการ decode JWT token
สร้าง JWT validator ขึ้นมา
ก่อนอื่นก็เริ่มจากการสร้าง enum ขึ้นมาเพื่อกำหนด roles ซะหน่อย ถ้าจะเก็บเป็น String ก็ได้เหมือนกันครับ แต่ผมว่าแบบนี้มัน clean กว่า
ต่อมา เราก็สร้าง class เพื่อทำการ validate JWT ของเราได้แล้วครับ คำอธิบาย
- สร้าง method ที่มีชื่อว่า
hasApplicationRoleเริ่มจาก get JWT จาก client ซึ่งมันจะ wrap อยู่ในAuthenticationDetailsของ classAuthenticationอีกที ต้อง check ด้วยว่าเป็นOAuth2AuthenticationDetailsด้วยนะ - ต่อมาทำการ decode JWT แล้วก็ check
rolesclaim ว่ามี Read หรือ Write ไหม
Configure ให้ Global security method ใช้ hasApplicationRole ใน JWT validator
คำอธิบาย
- ในส่วนนี้เราต้องใส่ flag
prePostEnabled = trueด้วย เพราะว่าเราจะ validate authorization ก่อนเข้า method ใน Spring controller ครับ - ต้อง inject Spring
ApplicationContextเข้ากับตัว handler ของเราด้วยครับ ไม่งั้นจะเจอ error แบบนี้
ApplicationContextException: Unable to start web server; nested exception is org.springframework.context.ApplicationContextException: Unable to start ServletWebServerApplicationContext due to missing ServletWebServerFactory bean.
Configure resource server ด้วย OAuth2SecurityConfiguration
คำอธิบาย
- ใช้
jwkTokenStoreในการ verify issuer จากissclaim ใน JWT โดยใช้ JWK ที่อยู่ใน JWK set ตาม uri - ใช้
DefaultTokenServicesในการจัดการtokenStoreและช่วย create refresh token (token เพื่อขอ access token อีกที) - เปิด authenticate (ทั้ง user ใหม่และ remember-me user) ในทุกๆ method ที่มี
@PreAuthorize(เดี๋ยวเราจะไปใส่ใน controller method)
เพิ่ม @PreAuthorize ใน Spring RestController method
จบด้วยการ configure OAuth2 security resource
ทดสอบด้วยการ get access token มาจาก Azure ผ่าน Postman
การที่ client จะได้ JWT access token จาก authorization server เราต้องทำอย่างไรบ้างละ
- เจ้าของ resource server ต้องไป configure application รวมถึง roles (ตัวอย่างคือ Read และ Write) ใน Azure Active Directory (Azure AD)
- client ทำการสร้าง client secret ขึ้นมาใน Azure AD application เพื่อใช้เป็นส่วนหนึ่งในการ request ขอ JWT
-
client ส่ง request มาตามนี้

- นำ access token ที่ได้ไป request ที่ API ได้เลย เป็นอันเสร็จพิธี
ขอจบ blog ไว้เท่านี้ก่อนละกัน blog หน้าจะมาต่อเรื่องนี้แหละครับ แต่จะเป็นการเขียน test เพื่อทดสอบ authentication ของเรากัน
ไปดูตัวอย่างโค้ด https://github.com/raksit31667/example-spring-order